Jaypoc dotCom
  • Home
  • About Jaypoc
    • About Jaypoc
    • Geocaching
    • Magic and Illusion
    • Photography
  • My Videos
  • Live Web-Cam
  • Contact Me

Category Archives: Uncategorized

Rediscovering Film: Starting My Journey To The Darkroom.

Posted on February 9, 2026 by jaypoc

Several factors led to my renewed interest in film photography. I worked as a portrait photographer in the early 2000s, where I learned to load and shoot rolls of 70mm film with an old Camerz camera. A few years ago, I inherited my wife’s grandfather’s Canon F-1 camera, and a few months ago, a friend at our local camera club sold me a 1950s Kodak Duaflex IV. This was the final catalyst that led me to pick up yet another hobby.

I soon learned that the Duaflex IV uses 620 roll film—and just as quickly discovered that it’s no longer available. Fortunately, Kodak had originally spooled standard 120 film onto their own proprietary spools to encourage customers to buy Kodak film. That meant that, with a bit of tweaking, I could still use modern film in the Duaflex. You can re-spool 120 film onto an existing 620 spool, but that seemed more complicated than necessary. A toenail clipper and some sandpaper did the trick nicely. There are plenty of videos online explaining the process, but essentially you clip the rim off the spool and sand down the remaining parts. The 120 roll then fits neatly into the 620 camera.

Some of the first photos I took on my Kodak Duaflex IV on 120 film modified to fit.

I brought the first roll I shot to the local camera store and was pleasantly surprised by the results. I now knew the old camera worked—but I quickly realised it was going to be expensive to use…

…unless I learned to develop film myself.

Developing The Knack

There were a few things holding me back. For one, I couldn’t get film onto a reel for the life of me. I watched a dozen videos but just couldn’t get the hang of it—until I discovered reels with a built-in track that guides the film and ratchets it along using small ball bearings.

The actual development process felt completely foreign to me. I searched online and found a video of someone developing black-and-white film in his bathroom. With most focused on extremely technical details, this video showed that you could simply follow a few basic steps—and made it look surprisingly easy. Unfortunately, I haven’t been able to find the video again or I would share it here.

From what I can recall, he explained how he loaded the film in a bathroom with the door shut and the lights off. After adjusting the temperature by feel, he began with a rinse. He added developer and agitated for the first minute, then for about ten seconds every minute, for a total of 7.5 minutes. Instead of using a stop bath, he rinsed and agitated with water before moving on to the final fixing stage. All chemicals were returned to their original containers for reuse, and his developing was done. He hung the film to dry—and that was it. Extremely simple, but effective.

This is essentially the method I use today. I followed the directions for Kodak D-76 developer and Ilford Rapid Fixer and mixed my chemicals. Rather than working in a darkroom, I used a changing bag to prepare the film and load it into the developing tank. I then turned the sink in the laundry room into a makeshift workshop where I developed my first roll of film. It was magical opening the tank and seeing my negatives visible on the newly developed film.

For a few days, I used my cellphone to scan the film against an LED photo light. It wasn’t ideal, but it gave me a quick and easy way to scan and share my images. I inverted the photos using the curves tool in Lightroom Mobile and fine-tuned them using the available editing controls. I soon realized that for larger negatives, I’d need a better light source, and discovered the CS-LITE camera scanning light source.

It’s a small LED panel boasting 95+ CRI and works extremely well. The accessories were a bit pricey, so I found 3D models and printed a tray to hold 120 film on the light, along with a 35mm film holder. The cellphone scans looked even better and eventually led me to set up my Fuji X-T2 on a boom arm to scan images directly into my PC at the highest quality I could achieve.

I could now develop my own images, but it still felt like cheating to scan them into a computer and treat them like digital photos. I was hooked and now I wanted the full analog experience.

Looking On The Bright Side

I searched online for a good deal on a photo enlarger. I found someone selling an entire darkroom setup but it included a metal sink, and a lot of extras that I didn’t want. They weren’t willing to sell the enlarger separately, so I had to pass.

I reached out through my camera club and received a few responses, but couldn’t believe my luck when one person replied that he was cleaning out his basement and was willing to give me the equipment if I picked it up. Even better, he lived only about 30 minutes away. Before I knew it, I had an Omega System C-700 condenser enlarger and a Super Chromega C-700 dichroic enlarger, along with a timer, safelight, multiple film holders, an easel, a contact sheet maker, and even a full set of filters.
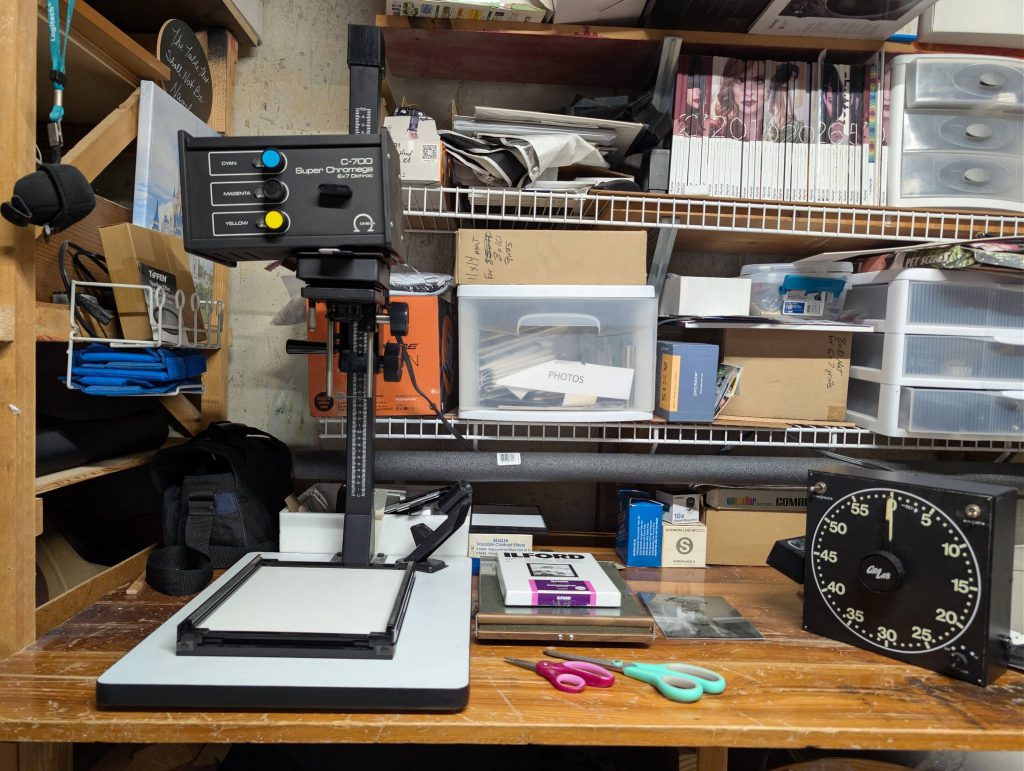
The enlarger set up on my table

I had a table in the corner of my basement that had become a dumping ground for photography bags, umbrellas, and light accessories, so I cleared it off and set up the enlarger. I needed space to develop prints, so I ordered a steel rolling prep table. It worked out perfectly: I could store chemicals on the shelf underneath and roll it into the laundry room to set up next to the sink. It was just large enough to hold multiple developer trays and also served as a workbench beside the enlarger.

I spent a few weeks sourcing the rest of the equipment and chemicals I’d need:

  • Developing trays (I initially bought a generic brand but later picked up Patterson trays, which I prefer)
  • Silicone tongs
  • Ilford Multigrade developer
  • IlfoStop for the stop bath (I wasn’t sure water alone would work here as it did with film development)
  • Ilford Rapid Fixer (to save money, I mixed a fresh batch using the same fixer I use for film)
  • Paper — I started with Ilford Multigrade 5×7 paper

Finally Up And Running

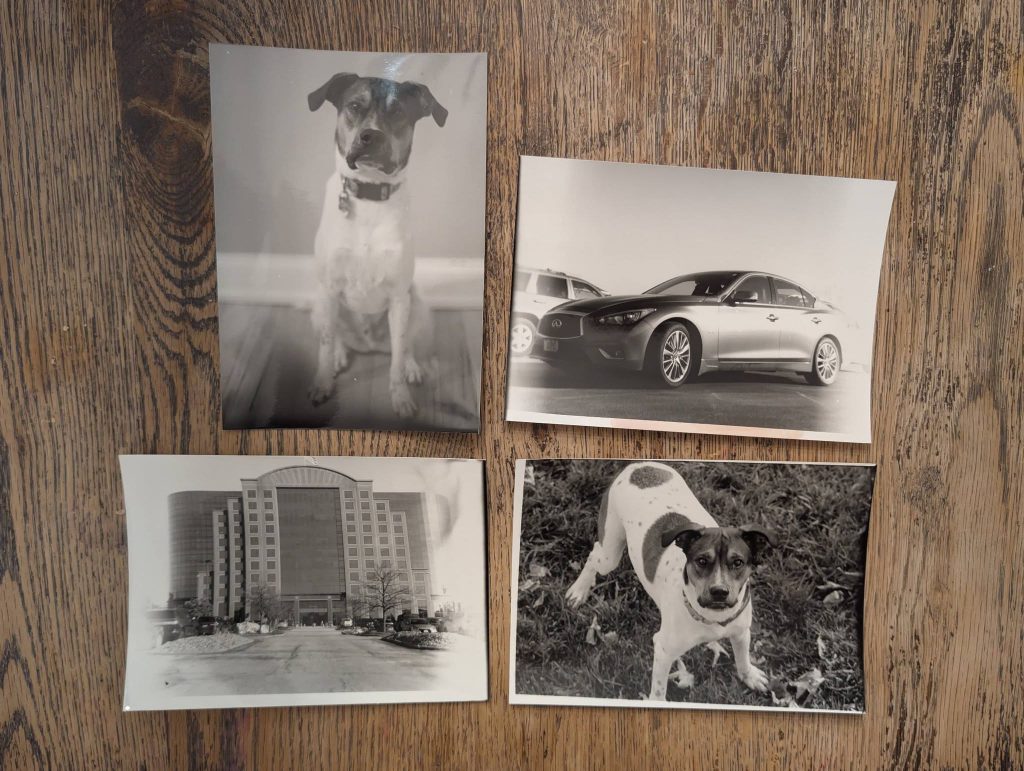
The printing process felt magical as the image slowly appeared on the paper. I managed to produce a few decent prints before learning my first big lesson. My safelight was very dim, and I could barely see beyond my immediate work area. I didn’t realize I’d left the paper bag open when I turned on the light to review my prints. The entire package was exposed to enough light to ruin every remaining sheet. Those packages aren’t cheap, so I was pretty upset with myself. I used the remaining sheets for testing and practice, though every print had dark edges and fogging where the paper had been exposed.
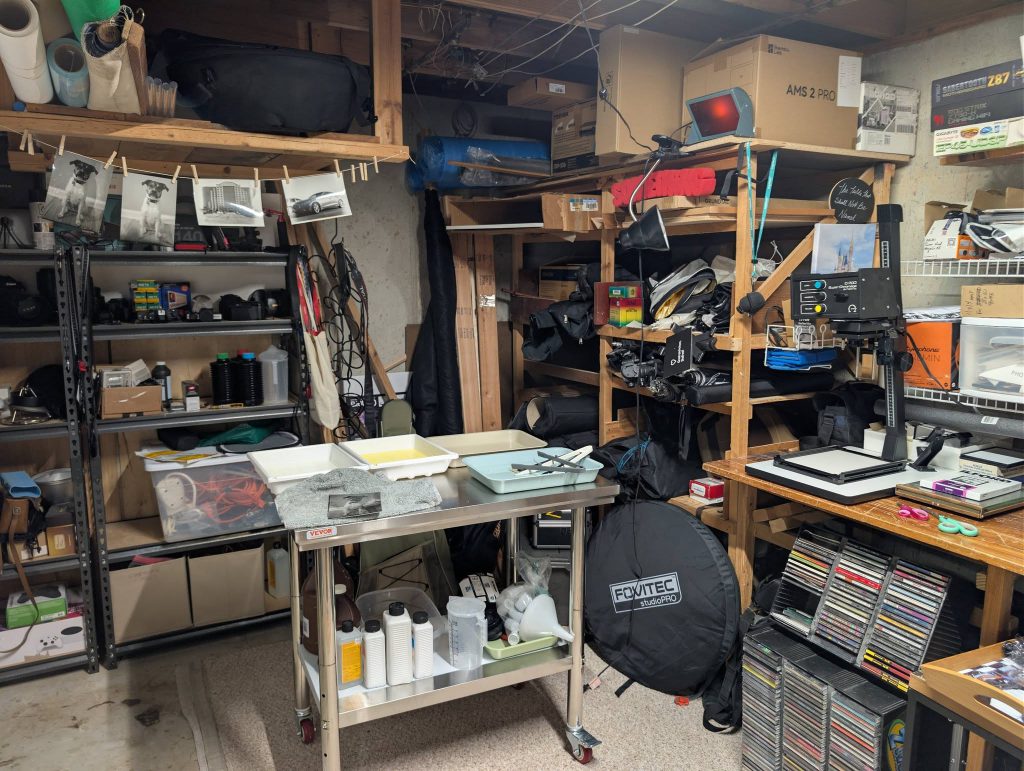
My home lab all set up
My first prints in my home “darkroom”

I picked up a package of 8×10 paper and, after just two prints, made the same mistake again. The fogging wasn’t as severe, but it still ruined my chance of making full-size 8×10 prints. I found a creative solution for salvaging the paper. By placing a mat with a 5×7 opening over the print, I could center the image on the sheet. It created a nice border around the image, and I can confidently say I like the look. I might experiment with a thinner mat to print slightly larger while keeping the border.

I later purchased a brighter red safelight that didn’t affect the paper. I can now actually see what I’m doing in the darkroom and visually confirm that the paper is put away before turning on the lights. It’s also much easier to set up the enlarger without constantly switching lights on and off.
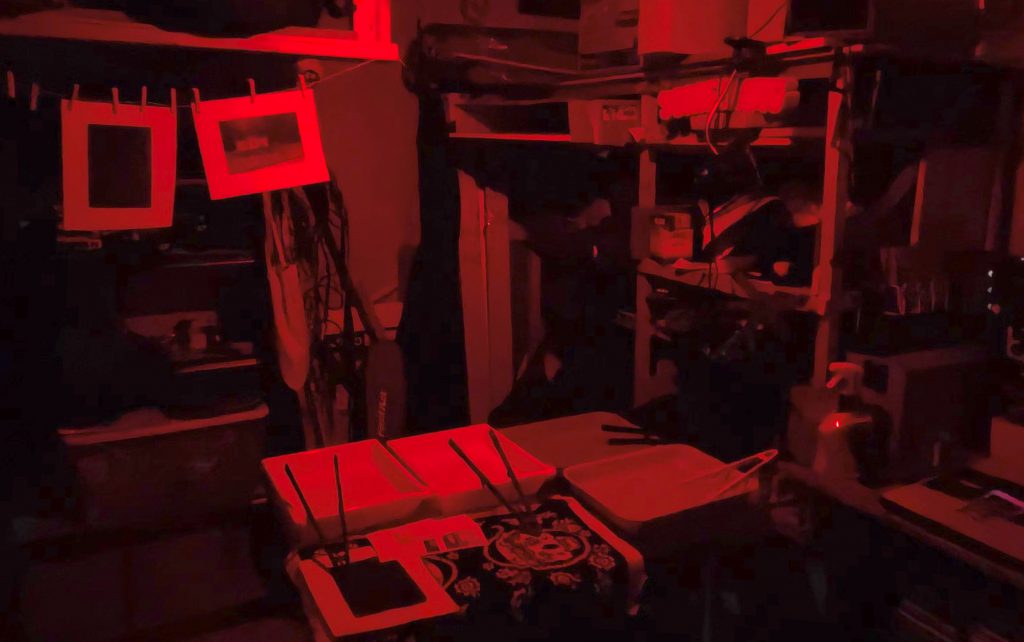
My “darkroom” with the red safety light

I’m still in the early stages of my journey, but it’s been a lot of fun—and I can’t wait to see what I create next (as soon as my new packages of paper arrive 😄).

Posted in Uncategorized | Leave a comment |

Halloween Decoration Tour (My 2025 Halloween display)

Posted on November 2, 2025 by jaypoc

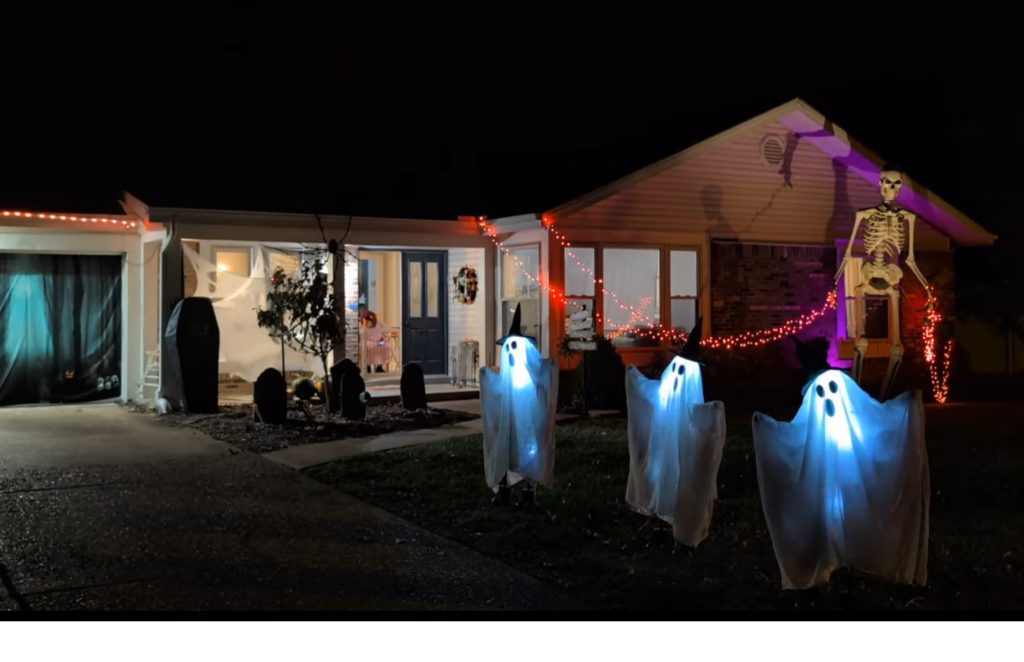
Halloween is one of my favorite holidays, but this year life kept me too busy to decorate early. I finally managed to pull everything together at the last minute! Take a quick peek at my Halloween decoration tour below—I’ll go into more detail about my setup after the video.

I woke up early on Halloween and headed to Lefty’s for an egg sandwich breakfast (Shameless plug for my favorite – and in my opinion the only decent bagels in/around Saint Louis!). When I got home, I jumped straight into decorating. Most decorations were already up, but nothing was powered yet. The wind and rain had really beaten up the graveyard.

Power struggles

We have an outlet on the side of the house, but it’s unreliable. When it works, it only stays on for a few minutes before cutting out again. It’s not a GFCI trip—I can’t reset it to keep it running. To fix it, I ran power from a bedroom window instead. That handled the house uplighting, skeleton uplighting, and the three new dancing ghosts. The remaining lights and props ran through a Light-O-Rama controller.

Destruction as a solution

The main roofline is lined with pixel lights, though bad weather knocked half of them down. I haven’t had time to fix them yet. Next year, I need a better mounting system that makes setup and removal easier. I hung a few hundred orange lights from the corner of the house to the skeleton’s hands and matched the pixels to the same color. The result was a 15-foot skeleton pulling glowing strands from the house. I even made the lights flicker and blink randomly for extra drama.

New Kids on the Block

One new feature this year was the set of dancing ghosts from Sam’s Club. They’re adorable—three connected ghosts that dance together. At first, I couldn’t figure out how to trigger them without an input, but once powered, they danced and sang nonstop. I like playing Halloween music, so I wanted to silence their song. With no volume control, I wrapped foam around the speaker to muffle it. It wasn’t perfect but worked well enough. Next year, I might open it up and disconnect the speaker completely.

An Arm and a Leg

Skeletons are easy to find and affordable—under $40 if you don’t need them fully articulated. I grab a few new ones each year. They’re usually the stars of my display, but this time I used only three: one by the mailbox, one in a rocking chair, and another climbing a nearby tree.

Doubles as a fun photo-op

I’ve seen tons of ads for garage-door covers with spooky Halloween scenes. Many looked suspicious, but Amazon offered some good, inexpensive ones. I bought two and loved how they turned out. The garage often gets ignored in my displays, so this was a fun upgrade. The trick is to secure the top first, then close the door and pull the cover tight. Once attached, the door still opens and closes smoothly.

Jaypoc's garage cover selfie

Which witch is which?

Beside the driveway, there’s a stump where we cut down a dying tree. It was surrounded with mulch, so I set up an old witch decoration. Around the base, I stacked firewood and a few skulls. A “fire” projector cast red, flickering light to create a glowing fire effect.

New structures and FX

We helped friends decorate their truck for a local Trunk-or-Treat. The theme was Harry Potter, so I made props from foam. Using a simple foam cutter, I shaped wooden-style signs, sealed them with Mod Podge, and finished them with wood stain for a realistic touch. I loved how they turned out and plan to experiment more with foam next year.

Other highlights included our blinking Beware sign and a graveyard with skeleton arms reaching from the ground. I didn’t have time to set up the projector or sync lights to music this year, but maybe I’ll start early for next Halloween!

Posted in Uncategorized | Leave a comment |

Adding patterns (.pat) in Photoshop 21.0.3

Posted on March 6, 2020 by jaypoc

Searching for a quick how-to can be a difficult task in today’s fast-based multi-media society. I was looking for the procedure to add a photoshop pattern (.PAT file) I had downloaded, and all I could find were videos explaining how to do it.

So, for those of you searching for the same, here is how you do it in Windows. Mac will have some variations, but should be similar.

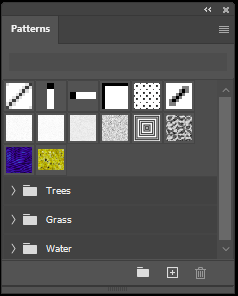
Open the Patterns window in Photoshop.

To enable the Patterns toolbox, click on Window > Patterns

Click on the “Hamburger Menu” (That’s the horizontal lines at the top right of the window) and select “Import Patterns”. This will open a file selection window starting in your Patterns folder. This is the folder where you want to save your .PAT files.

The file location on the PC is:
C:\Users\<User-Name>\AppData\Roaming\Adobe\Adobe Photoshop 2020\Presets\Patterns

Once you’ve copied the file there, it will appear in this dialog window. Select it and click “Load”.

That’s it! You can now use the new pattern in your project(s)

Posted in Photography, Uncategorized | Leave a comment |

Knights of Badassdom

Posted on February 12, 2014 by jaypoc

Last night, Kelly and I set out to see a showing of Knights of Badassdom as part of a series of fundraisers for Long Island’s I-CON convention. The film was first introduced at Comic-Con in 2011 but was shelved until late last year when it was released in Israel (Ironically, at another convention named Icon). The movie was recently released in the United States and is currently being shown in theaters nationwide through Tugg

Continue reading →

Posted in Uncategorized | Leave a comment |

Zen of Rocky Horror

Posted on February 2, 2014 by jaypoc

The cast and crew of The Zen Room and myself.

The cast and crew of The Zen Room and myself.

To end my Birthday celebration last night, a handful of us made it down to Babylon’s Bow-Tie cinemas to catch The Zen Room‘s shadow cast performance of Rocky Horror Picture Show.

This is the same Troupe (and many of the same individuals) who performed in the REPO: The Genetic Opera shadow cast I reviewed back in 2009 (Read that review here). The Zen Room puts on an amazing show with great costumes, props and it even seemed like their lighting had improved since I first saw them years ago.

If you’re a virgin (you haven’t seen RHPS in shadow cast), then you really need to get down to Bow Tie Cinemas in Babylon Village on the first Saturday of the month and check out The Zen Room’s production.

Posted in Uncategorized | Leave a comment |
Next Page »

Categories

  • Food
  • Humor
  • Magic and Illusion
  • News
  • Personal
  • Photography
  • Reviews
  • Technology
  • Uncategorized
  • Videos

Recent Posts

  • Rediscovering Film: Starting My Journey To The Darkroom.
  • Halloween Decoration Tour (My 2025 Halloween display)
  • Lights, Camera, Basement! A Father-Daughter Sci-Fi Adventure
  • What I’ve Been Up To (Hint: It Involves 3D Printers and Otamatones)
  • Adding patterns (.pat) in Photoshop 21.0.3

Recent Comments

  • Jaypoc on Sprint Issues Come To An End
  • jaypoc on Canon D60 at PPE
  • Jaypoc on Canon D60 at PPE
  • Jaypoc on Photographing Cosplayers
  • ActionVance on Photographing Cosplayers

Categories

Archives

CyberChimps WordPress Themes

Copyright © 1998-2019 Jason Bauman. All rights reserved.